
Key takeaways
- Measure vertical clearance, not just floor space. Subtract the height of your platform or mats from your ceiling, then confirm the rack’s listed overall height clears it with at least a few inches to spare. If pull-ups are non-negotiable, you need enough room to hang without tucking your knees.
- Check the upright tube size and hole spacing. Two-inch square tubing with 1-inch spacing near bench and squat heights gives you far better bar positioning than wide 3-inch increments. It’s also the spec that determines which attachments bolt on later.
- Read the capacity rating the way the manufacturer wrote it. Listed numbers often describe distributed load across J-hooks or safety bars, not a single dropped rep. Build in a healthy margin over your working weight rather than shopping right at the ceiling of the rating.
- Decide early whether you can drill the floor. Renters usually can’t, which pushes you toward a wider base, a frame you can weight down with plates, or a stand paired with a heavy rubber mat for friction.
- Plan the exit path. A rack that boxes in a water heater, breaker panel, or garage door track will annoy you every week. Sketch the footprint on the floor with painter’s tape and walk around it for a day before you commit.
What's inside
The tape measure ruins more home gym plans than the budget does. A standard 7-foot Olympic barbell is 86 inches long and needs roughly 4 inches of wiggle room on each side to rack and unrack without scraping paint, which means a squat rack in a single-car garage bay is already eating most of one wall. Then there’s height: pressing overhead inside a cage with 8-foot drywall ceilings leaves about 12 inches between the top of your knuckles and the joists, and that gap disappears fast if you stand on a platform or wear thick lifters. Tight-space rack shopping is less about which brand looks best on Instagram and more about which footprint lets you still open the car door.
CAP Barbell’s rack lineup keeps showing up in cramped basements and shared garages for a straightforward reason: it spans several form factors — full four-post cages, shorter two-post stands, and half-rack style frames — at prices that leave room in the budget for plates. The trade-offs are real, and this guide walks through where the steel earns its space, where you’ll want to bolt things down, and how the attachment ecosystem changes what a small setup can actually train. Measure your ceiling before you read the table below; it will make the decisions obvious.
As an Amazon Associate we earn from qualifying purchases at no extra cost to you. Product prices and availability are accurate as of the date shown and are subject to change.

#1 Pick

#2 Pick

#3 Pick


#5 Pick

#6 Pick

#7 Pick

Quick Comparison
| Configuration | Typical Space Demand | Best Suited For | Main Limitation |
|---|---|---|---|
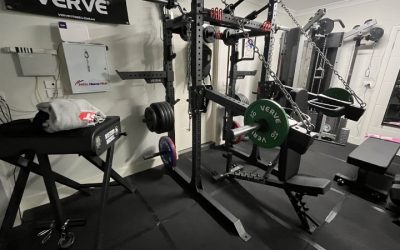
| Full four-post power rack | Widest and deepest option; needs clear overhead room for the pull-up bar | Solo lifters who want safety bars for heavy squats and bench | Hardest to relocate once assembled; tallest models fight low ceilings |
| Squat stand / two-post frame | Smallest footprint, often narrow enough to slide against a wall | Apartments, shared garages, anyone who needs to move the rack aside | No rear posts means no safety bar catch behind you |
| Half-rack style frame | Middle ground; front posts plus shortened base | Lifters who want J-hook adjustability without full cage depth | Usually requires anchoring or plate loading for stability |
| Attachments (dip bars, landmine, plate horns) | Adds a few inches per side rather than a new footprint | Expanding exercise options without expanding the gym | Compatibility depends on tube size and hole spacing |
How to Choose
- Measure vertical clearance, not just floor space. Subtract the height of your platform or mats from your ceiling, then confirm the rack’s listed overall height clears it with at least a few inches to spare. If pull-ups are non-negotiable, you need enough room to hang without tucking your knees.
- Check the upright tube size and hole spacing. Two-inch square tubing with 1-inch spacing near bench and squat heights gives you far better bar positioning than wide 3-inch increments. It’s also the spec that determines which attachments bolt on later.
- Read the capacity rating the way the manufacturer wrote it. Listed numbers often describe distributed load across J-hooks or safety bars, not a single dropped rep. Build in a healthy margin over your working weight rather than shopping right at the ceiling of the rating.
- Decide early whether you can drill the floor. Renters usually can’t, which pushes you toward a wider base, a frame you can weight down with plates, or a stand paired with a heavy rubber mat for friction.
- Plan the exit path. A rack that boxes in a water heater, breaker panel, or garage door track will annoy you every week. Sketch the footprint on the floor with painter’s tape and walk around it for a day before you commit.
Top Picks Reviewed
CAP Barbell Power Racks and Attachments — Best Overall Value for Small Rooms
What makes this lineup work for tight spaces is optionality. Rather than one flagship cage, CAP offers frames at several depths and heights, so you can pick the model that fits your ceiling instead of forcing a tall rack into a low room. The full cages give you adjustable safety bars on both sides of the lift, which is the single most useful feature for anyone training alone with no spotter — you can bail a failed squat onto steel instead of your spine. Assembly is bolt-together and typically a two-hour job with a socket wrench; a second set of hands makes squaring the frame much faster. Fit and finish is functional rather than boutique: expect powder-coated steel, some paint variance around welds, and hardware you’ll want to re-torque after the first couple of weeks of use. For the money, the steel-to-dollar ratio is hard to argue with.
The Compact Configurations — When Footprint Beats Features
If your rack has to share a room with a car, a washer, or a couch, the shorter stands and reduced-depth frames deserve a serious look. Losing the rear uprights costs you the safety catch behind the bar, so pair a stand with adjustable spotter arms if the model supports them, and keep your working sets conservative on squats. The upside is mobility: a two-post frame can often be shuffled against a wall between sessions, and it clears the overhead line in basements where a full cage simply won’t stand up. Bench pressing on a stand is workable but demands discipline about loading only what you can confidently press or safely dump.
The Attachment Ecosystem — Buying Exercises Instead of Equipment
Attachments are how a small rack stops being just a squat holder. Dip handles turn the uprights into an upper-body station with no added floor space. Weight plate horns pull plates off the ground and onto the frame, which both tidies the room and adds ballast where you need it. A landmine sleeve opens up rotational and pressing work in a corner. Before ordering, confirm the attachment matches your rack’s tube dimension and hole diameter — mismatched hardware is the most common frustration in this category, and it’s entirely avoidable by comparing specs on the listing rather than assuming universal fit.
Frequently Asked Questions
What ceiling height do I actually need?
For squats and bench inside a rack, most people are fine at 7.5 feet. Overhead pressing and pull-ups are the constraints: budget for your standing reach plus about 8 to 10 inches, and remember that flooring adds to your height. If you’re under 8 feet, prioritize a shorter frame and do pull-ups on a separate doorway or wall-mounted bar.
Do I have to bolt the rack to the floor?
Not always, but stability improves dramatically when you do. If drilling isn’t an option, load plates onto the base or plate horns, set the rack on dense rubber mats to reduce sliding, and avoid aggressive bar drops from the top of the uprights. Anchoring becomes far more important on half-rack and two-post designs than on a wide four-post cage.
Can this handle a heavy bench and squat program?
For the vast majority of home lifters, yes. Check the specific model’s rated capacity and treat that figure as a working ceiling with margin built in. What tends to fail first is not the frame but the plastic or nylon inserts on J-hooks, which wear from repeated metal-on-metal racking — inexpensive to replace and easy to protect by racking gently.
What else do I need to budget for?
A rack alone doesn’t train you. Plan on a barbell rated for your lifts, plates, an adjustable bench that fits inside the frame, and flooring — either horse stall mats or stacked rubber tiles — to protect concrete and dampen noise. Flooring is the item people skip and regret first.
Final Thoughts
Small-space strength training is an exercise in honest arithmetic. Once you know your ceiling height, your usable floor width, and whether you can put anchors in concrete, the right rack usually selects itself. CAP Barbell’s range fits that process well because it offers real choices across footprints at a price that doesn’t consume the whole equipment budget, leaving room for the bar, plates, and mats that make the rack useful. Choose the largest frame your room genuinely allows, add safety bars or spotter arms if you train alone, and expand with attachments rather than more furniture. A tight garage bay can support years of serious lifting — it just needs a layout planned with a tape measure instead of optimism.
Write Your Review
No reviews yet. Be the first to share your experience!